If you’re feeling anxious about mastering mouth care for your CNA skills test, you’re experiencing what most nursing students face. The pressure to remember provider-specific protocols while preparing for intimate care procedures creates genuine stress. Understanding exactly what evaluators look for can transform that anxiety into confidence.
Student experiences during training
CNA students frequently express concerns about practicing mouth care on classmates during training. One student shared in community discussions: “At my school, we practiced skills on each other. We did: mouth care, vitals, repositioning, feeding, and transfers. I had anxiety over it too, but the teacher said if we are going to be doing this with patients, we should know how it feels.”
This discomfort is completely normal and reflects your developing professional awareness.
Why mouth care testing matters
Mouth care appears on every CNA skills test because proper oral hygiene prevents serious complications. Evidence shows that structured oral care programs reduce pneumonia rates by 31% in healthcare facilities when implemented correctly. Your testing skills directly translate to patient safety in real-world settings.
Testing providers evaluate mouth care differently, but mastering the core techniques while understanding specific variations ensures success regardless of your provider. This guide covers both natural teeth and denture care procedures, evidence-based resistance management techniques, and current 2024-2025 provider requirements.
CNA Mouth Care Requirements: Natural Teeth vs Dentures [2025]
Critical testing distinction
Working CNAs often clarify an important distinction: “Where I’m from, we used Credentia, and mouth care and denture care are explicitly different skills to be tested on.” Testing providers separate these procedures because they require different techniques, supplies, and safety considerations.
Different procedures, different requirements
Natural teeth care focuses on plaque removal and gum health, while denture care emphasizes proper handling and storage protocols. Never combine techniques or supplies between these procedures during testing.
Addressing training anxiety
Students sometimes worry about performing mouth care during peer practice sessions. This anxiety reflects normal professional development as you learn to provide intimate care with dignity and competence. Program directors notice that students who understand the reasoning behind each step perform better during both training and testing.
From testing to patient care
The emotional journey from student to caregiver includes learning to bridge testing perfection with real-world patient needs. Testing standards ensure you can provide safe, effective care even when patients resist or present challenges you didn’t encounter during practice sessions.
Master This Skill With Expert Video Guides
Join 6,000,000+ students who passed with Mometrix’s proven study system
Get Instant Access →Natural Teeth Mouth Care: Complete CNA Testing Procedure
Step-by-Step Testing Protocol
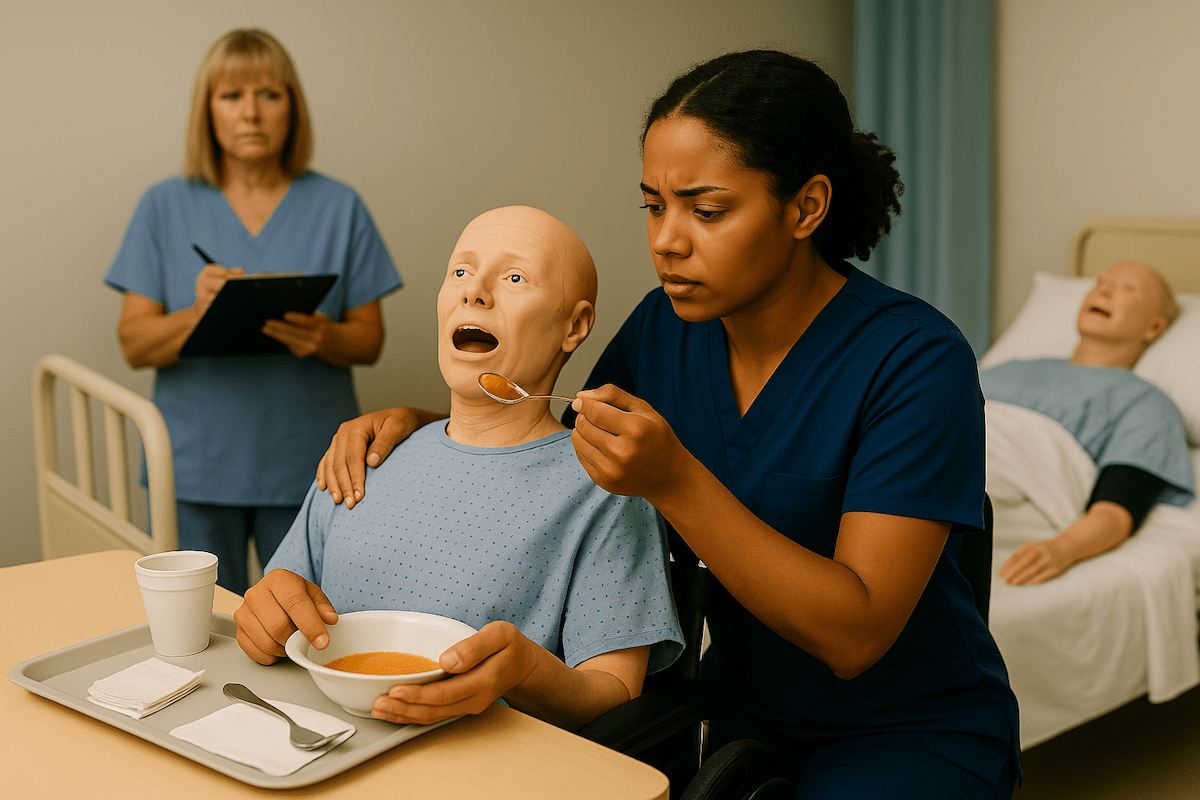
1. Gather Supplies Before Patient Contact
- Soft-bristled toothbrush, toothpaste, emesis basin, towel, cup with water, gloves
- Why this matters: An Organized setup prevents contamination and demonstrates professional preparation to evaluators.
2. Position Patient Correctly for Safety
- NNAAP: 75-90° upright (required)
- Prometric: 60-90° acceptable range
- Headmaster: Per the care plan, typically upright
- Why this matters: Proper positioning prevents aspiration during rinsing
3. Apply Infection Control Protocol
- Perform hand hygiene per provider requirements
- Put on gloves before handling the toothbrush
- Why this matters: Glove timing varies by provider and affects scoring
Hand Hygiene Provider Differences:
- NNAAP: Handwashing at the sink is required
- Headmaster: ABHR unless “with hand washing” is specified
- Prometric: Standard precautions scored throughout (Indirect Care)
4. Clean All Tooth Surfaces Systematically
- Brush the chewing surfaces, the tongue side, and the cheek side
- Include the gum line with gentle circular motions
- Clean tongue and inner cheeks
- Why this matters: Complete cleaning prevents plaque buildup and demonstrates thorough technique
5. Manage Rinsing Safely
- Offer water for rinsing
- Hold the emesis basin to catch rinse water
- Never allow swallowing of excess toothpaste
- Why this matters: Proper rinse technique prevents choking and maintains infection control
6. Complete Equipment Care
- Rinse the toothbrush thoroughly
- Empty, rinse, and dry the emesis basin completely
- Store equipment per facility protocol
- Why this matters: Prometric requires equipment to be “completely dry” – incomplete drying causes point deductions
CNA Denture Care Steps: Complete Testing Procedure Guide
Critical Safety Distinction
Working CNAs emphasize this separation: denture care and natural teeth care are evaluated as completely different skills. Never combine techniques or supplies between these procedures.
Step-by-Step Denture Care Protocol
1. Prepare Sink for Safety
- Line sink with a towel or place a towel at the bottom
- Fill the sink partially with cool water
- Why this matters: A Towel prevents denture breakage if dropped during cleaning.
2. Remove Dentures Carefully
- Use gauze or tissue for a better grip
- Remove the upper denture first, then the lower
- Handle gently to prevent damage
- Why this matters: Proper removal technique prevents injury to the patient’s gums and denture damage.
3. Clean Dentures Thoroughly
- Use cool or tepid water only (never hot)
- Brush all surfaces: teeth, gum side, and edges
- Use denture cleanser or mild soap (not toothpaste)
- Why this matters: Hot water warps dentures; toothpaste is too abrasive for denture materials
4. Store Properly During Care
- Place cleaned dentures in a container with clean water
- Label the container with patient information
- Keep dentures moist to prevent warping
- Why this matters: Dry dentures lose shape and won’t fit properly
5. Clean Oral Tissues
- Gently clean gums, tongue, and palate with a soft brush or gauze
- Remove any adhesive residue
- Check for sores or irritation
- Why this matters: Tissue care prevents infection and maintains oral health
Community Reality Check:
One CNA noted the workplace shortcut: “For those with dentures, we’d just pop them out and put them in the container with a tablet.” Testing requires complete brushing – tablets alone don’t replace proper cleaning technique.
Practice With 600+ CNA Exam Questions
See exactly how this skill appears on the real test
Interactive Mouth Care Skills Checklist
Practice makes perfect, and our interactive mouth care checklist helps you master every step before your skills test. This comprehensive tool covers natural teeth and denture care procedures, with provider-specific variations clearly marked so you can customize your practice to match your testing location.
Download the PDF version to practice offline or share with study partners. Many students find that checking off each completed step builds confidence and identifies areas needing more focus.
What to Do When Patients Refuse Mouth Care: Evidence-Based Techniques
Understanding Resistance Sources
Patient resistance usually has specific causes: pain, fear, confusion, or past negative experiences. Evidence-based approaches address root causes rather than forcing compliance.
PAINAD Quick Assessment
- Look for facial grimacing or guarding
- Note moaning or withdrawal behaviors
- Check for denture sore spots or dry mouth
- Action: Address pain causes before continuing care
MOUTH Protocol Techniques (Research-Proven)
1. Tell-Show-Do Approach
- Explain briefly what you’ll do
- Show the toothbrush and demonstrate
- Proceed slowly, watching for distress
- Research support: RCT showed improved care completion rates with threat-reduction training
2. Offer Simple Choices
- “Mint toothpaste or plain?”
- “Brush now or after your show?”
- “Sit up or stay comfortable?”
- Why this works: Restores patient control and reduces resistance.
3. Hand-Over-Hand Guidance
- Let the patient hold the second toothbrush while you work
- Guide their hand through motions if willing
- Use the bridging technique for comfort
- Evidence: Person-centered approaches reduce care resistance significantly
Workplace Application:
Programs implementing structured mouth care protocols show a 31% reduction in pneumonia in Year 1. Your testing skills directly translate to patient safety when applied with compassion.
When to Pause and Retry
- If resistance increases, stop immediately
- Try a different time, approach, or supplies
- Document what worked for the next attempt
- Never force care or restrain patients
CNA Testing Provider Differences: NNAAP vs Prometric vs Headmaster 2025
Current Protocol Variations (2024-2025)
Understanding provider differences prevents confusion during testing. Each system emphasizes different aspects of mouth care while maintaining core safety principles.
Positioning Requirements
| Provider | Required Position | Flexibility |
| NNAAP | 75-90° upright | No variation allowed |
| Prometric | 60-90° elevation | Broader acceptable range |
| Headmaster | Per care plan | Usually upright positioning |
Hand Hygiene Protocols
NNAAP (Credentia):
- Handwashing at the sink is required at the end
- No substitution with alcohol-based hand rub
- Gloves before cleaning, handwashing after glove removal
Prometric:
- Standard precautions scored continuously (Indirect Care)
- Hand hygiene per facility protocol
- Infection control behaviors were evaluated throughout the entire skill
Headmaster:
- ABHR is preferred for routine hand hygiene
- “With Hand Washing” is specified only for certain tasks
- Gather supplies first, then apply gloves to prevent contamination
Equipment Management Standards
NNAAP Protocol:
- Rinse the toothbrush thoroughly
- Empty, rinse, and dry the emesis basin completely
- Dispose of linens properly before hand hygiene
Prometric Requirements:
- Leave the over-bed table completely dry
- Store all cleaned equipment appropriately
- Indirect Care scoring includes equipment management
Headmaster Standards:
- Empty and rinse the emesis basin, and ensure dry storage
- Rinse the toothbrush under running water
- Return equipment to the designated storage area
Testing Day Preparation Tips
Know your specific provider before test day. State handbooks contain provider-specific details that affect scoring. Current 2024-2025 updates reflect post-COVID protocols that remain in effect.
CNA Mouth Care Video Demonstrations
Visual learners benefit from seeing proper mouth care techniques demonstrated by experienced CNAs and instructors. These curated video demonstrations show the complete procedures for natural teeth and denture care, helping you understand the appropriate positioning, hand movements, and professional communication evaluators look for during testing.
Watching multiple demonstrations helps you recognize the consistent elements across different teaching styles while building confidence in your technique.
Frequently Asked Questions About Mouth Care
Position patients 75-90° upright for NNAAP testing, 60-90° for Prometric. Proper positioning prevents aspiration by allowing rinse water to flow forward rather than toward the throat. Never attempt mouth care with patients lying flat.
Essential supplies include a soft-bristled toothbrush, toothpaste, an emesis basin, a towel, a cup with water, and gloves. Organize supplies before patient contact to demonstrate professional preparation and prevent contamination during the procedure.
No. Research shows foam swabs are ineffective for plaque removal. Testing requires actual toothbrush use for proper cleaning. Foam swabs may be used for moistening lips or applying mouth care products, but never as primary cleaning tools.
Allow 8-12 minutes for thorough mouth care, including setup, positioning, cleaning, rinsing, and equipment care. Rushing compromises technique and safety. Evaluators score completeness over speed.
These are separate testing skills requiring different techniques. Natural teeth care focuses on brushing all tooth surfaces and gum lines. Denture care requires sink protection, cool water only, and proper storage in clean water containers.
Use de-escalation techniques: approach calmly, offer choices, explain benefits, and try again if initial resistance occurs. Never force care. Testing scenarios may include resistance to evaluate your professional response and patient rights awareness.
Core safety steps remain consistent, but providers vary in positioning requirements, hand hygiene protocols, and equipment management. NNAAP requires 75-90° positioning and handwashing, while Prometric accepts 60-90° and scores infection control continuously.
Ready to Ace Your CNA Exam?
Get everything you need: video guides, practice tests, and detailed study plans