If you’re anxious about your CNA skills test, especially the passive range of motion evaluation, that feeling makes complete sense. One student’s experience perfectly captures this anxiety: they achieved 100% on their first two skills but failed overall because they said “uncomfortable” instead of “discomfort” during PROM exercises.
These precision requirements can feel overwhelming, but understanding exactly what each testing provider expects transforms anxiety into confident preparation. The disconnect between testing requirements and workplace reality adds another layer of frustration for CNA students.
Why PROM Testing Still Matters
Students often express concerns like “I didn’t even understand why this is a skill anymore. Most nurse aides don’t even do range of motion anymore!” This frustration reflects a genuine workplace truth: hospital CNAs rarely perform independent PROM since physical therapy staff typically handle these exercises.
However, PROM testing serves important preparation purposes across different healthcare settings:
- Nursing Homes: Federal regulations (42 CFR 483.25(c)) require facilities to maintain residents’ range of motion, and CNAs routinely perform these exercises as part of restorative care.
- Home Health: CNAs commonly provide PROM under care plans when therapists aren’t present daily, bridging gaps between professional therapy visits.
- Skill Transfer: Understanding proper technique prepares students for any care setting where these skills become necessary.
What CNAs Need to Know About PROM Testing Requirements
Hospital CNAs typically assist with patient mobility and positioning. Still, formal range-of-motion exercises usually fall to physical therapy staff who have dedicated time and specialized training for therapeutic interventions.
Where CNAs Actually Perform PROM
CNAs working in nursing homes encounter completely different expectations. These facilities must demonstrate ongoing efforts to maintain residents’ functional abilities, which means CNAs often perform daily PROM exercises during routine care. Many nursing homes employ “restorative aides” – CNAs with additional training who specifically focus on therapeutic exercises between therapy visits.
Home health presents another scenario where CNAs regularly perform PROM. When clients need daily range-of-motion exercises but only receive therapy visits twice weekly, home health aides bridge that gap by providing maintenance exercises under the care plan.
Testing Standards Reflect Real-World Needs
Testing providers recognize these variations, which is why they continue evaluating PROM competency. Students who understand the technique can adapt to any care setting where these skills become necessary.
The precision required during testing – exact verbalization, proper joint support, appropriate movement timing – reflects the attention to detail needed when working with vulnerable populations who depend on safe, competent care.
Provider-Specific PROM Testing Protocols: NNAAP vs Prometric vs Headmaster
Understanding your testing provider’s specific requirements eliminates the guesswork that creates student anxiety. Each system has distinct protocols that directly impact testing success.
NNAAP (Pearson VUE/Credentia) Critical Requirements
NNAAP testing includes two possible PROM skills: shoulder exercises OR knee and ankle exercises combined. The computer randomly assigns one during your five-skill examination, so prepare for both possibilities.
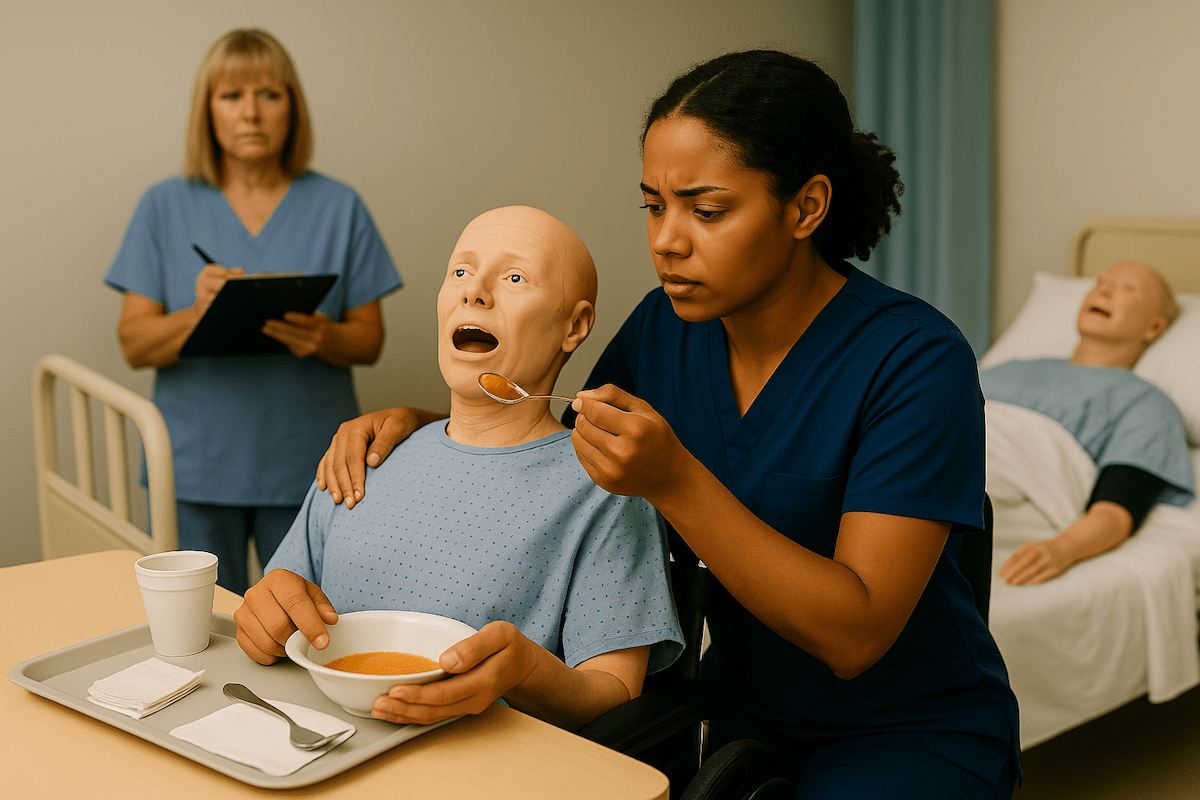
- Verbalization Requirements (Most Critical Element): Students must instruct clients to “report any pain or discomfort” both before beginning exercises and during movement performance. The exact wording matters tremendously – saying “let me know if this hurts” or “tell me if you feel uncomfortable” doesn’t meet the specific requirement for the word “discomfort.”
- Joint Selection Guideline: Candidates typically choose which side to exercise unless the scenario specifies otherwise. For knee and ankle exercises, patients must be positioned supine in bed. Each movement requires three repetitions unless the client reports pain.
Prometric Standards and Key Differences
Prometric offers three possible PROM skills: shoulder exercises, elbow and wrist combined, OR hip, knee, and ankle combined. This broader range means students must master techniques across more joint combinations.
Critical Difference
Side Specification: The testing instructions explicitly specify which side (left or right) to exercise – performing on the wrong side typically results in automatic failure. Students frequently mention this concern: “certain things are an instant fail, for example… picking up the wrong arm during range of motion.”
Communication Requirements:
- Greet the resident by name and introduce yourself (counts toward “Indirect Care” scoring)
- Ask residents to report pain or discomfort (more flexible wording than NNAAP)
- Maintain courteous interaction throughout the exercise sequence
Headmaster Protocols and Flexibility
Headmaster testing typically includes two PROM options: shoulder exercises OR hip and knee exercises. Headmasters don’t require separate ankle movements in their hip and knee skills, which differ from both NNAAP and Prometric protocols.
- Pain Inquiry Flexibility: Candidates must ask “at least once during PROM” if the resident experiences any discomfort or pain. This timing flexibility helps students who might forget the exact moment for verbalization, as long as they address comfort at some point during the exercise sequence.
- Movement Guidelines: The instruction to “never force any joint beyond the point of free movement” emphasizes gentle handling and immediate response to resident cues about limitations or discomfort.
Quick Provider Comparison
| Provider | Joint Options | Verbalization Key Requirement | Side Selection | Pass/Fail Factor |
| NNAAP | Shoulder OR knee+ankle | “Discomfort” before AND during | Candidate choice | Wrong word = failure |
| Prometric | Shoulder, elbow+wrist, OR hip+knee+ankle | Ask about discomfort + greet by name | Explicitly specified | Wrong side = failure |
| Headmaster | Shoulder OR hip+knee | Pain inquiry “at least once” | Either acceptable | Timing flexible |
Master This Skill With Expert Video Guides
Join 6,000,000+ students who passed with Mometrix’s proven study system
Get Instant Access →Critical PROM Technique Steps That Prevent Test Failures
Students consistently struggle with specific elements that cause failures despite good overall technique. Understanding these critical steps with provider-specific context builds testing confidence.
Universal Preparation Steps (All Providers)
Step 1: Approach and Introduction
- Knock and announce yourself before entering
- Greet the resident appropriately (by name for Prometric)
- Explain the procedure in simple terms: “I’m going to help exercise your [shoulder/arm/leg] to keep your joints moving well.”
- Testing insight: Clear communication establishes rapport and demonstrates professional interaction
Step 2: Positioning and Safety Setup
- Ensure the bed is at the appropriate working height
- Position the resident correctly (supine for leg exercises, comfortable for the shoulder)
- Check that you have clear access to the joints you’ll be exercising
- Testing insight: Proper positioning prevents awkward movements that could cause injury
Step 3: Critical Verbalization (Provider-Specific)
- NNAAP: “Please let me know if you feel any pain or discomfort” (say before AND during)
- Prometric: “Tell me if you feel any discomfort during these exercises” (flexible timing)
- Headmaster: Ask about pain or discomfort at least once during the sequence
- Testing insight: Exact wording prevents automatic failures – practice the specific phrase for your provider
Joint-Specific Exercise Techniques
Shoulder Range of Motion Steps
Step 4: Shoulder Support and Positioning
- Support the resident’s elbow and wrist throughout all movements
- Keep movements slow, smooth, and controlled
- Watch the resident’s face for signs of discomfort
- Testing insight: Proper support prevents joint stress and demonstrates safe technique
Step 5: Shoulder Flexion/Extension (3 repetitions)
- Slowly raise the arm straight up toward the ceiling, then back down to the bed
- Support at the elbow and wrist during the entire movement
- Stop immediately if the resident reports pain
- Testing insight: Full range requires the arm to reach a vertical position unless limited by comfort
Step 6: Shoulder Abduction/Adduction (3 repetitions)
- Move the arm out to the side away from the body, then back to the side
- Maintain support and watch for discomfort cues
- Keep movement in the horizontal plane to avoid shoulder impingement
- Testing insight: Side movement should reach approximately 90 degrees unless restricted
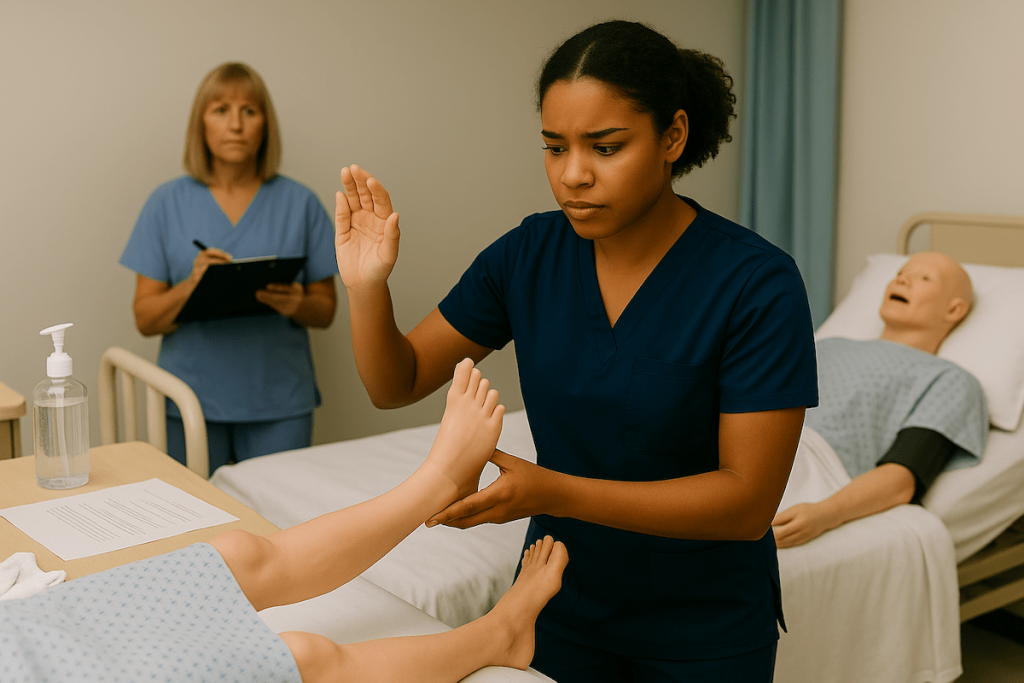
Knee and Ankle Range of Motion Steps
Step 7: Lower Extremity Support
- Support under the knee and ankle/heel during all movements
- Ensure the resident remains in a comfortable supine position
- Keep the opposite leg stable and comfortable
- Testing insight: Dual support points prevent joint strain and maintain control
Step 8: Knee Flexion/Extension (3 repetitions)
- Bend your knee toward your chest, then straighten your back to the bed surface.
- Support under the knee and heel throughout movement
- Allow natural hip flexion as the knee bends
- Testing insight: Movement should be smooth without forcing range beyond comfort
Step 9: Ankle Dorsiflexion/Plantarflexion (3 repetitions)
- Point toes toward the resident’s head (dorsiflexion), then away (plantarflexion)
- Support the leg while moving only the ankle joint
- Watch for calf muscle tightness that might limit movement
- Testing insight: Ankle movement isolates the joint without forcing the entire leg
Completion and Documentation
Step 10: Exercise Completion
- Return limb to comfortable resting position
- Ask the resident how they’re feeling after the exercises
- Thank them for their cooperation
- Testing insight: Professional conclusion demonstrates complete care and resident focus
Step 11: Safety and Follow-up
- Ensure the resident is comfortable and properly positioned
- Lower the bed to a safe height if raised
- Wash your hands or use hand sanitizer
- Testing insight: Safety measures show a comprehensive understanding of patient care standards
Practice With 600+ CNA Exam Questions
See exactly how this skill appears on the real test
Interactive PROM CNA Skills Checklist
Put your knowledge to the test with our interactive PROM skills checklist that adapts to your testing provider’s specific requirements. This dynamic tool walks you through each critical step, tracks your progress, and identifies areas needing additional practice before test day. Download the PDF version to practice offline or share with study partners during hands-on preparation sessions.
Managing PROM Performance Anxiety and Evaluator Pressure
Many students report that PROM creates unique testing anxiety because of the complex coordination required while being observed. One student shared: “I was a nervous wreck and completely messed up” – a common experience that’s completely manageable with targeted strategies.
Understanding PROM-Specific Anxiety Triggers
The complexity of PROM testing creates multiple anxiety points simultaneously. Students must coordinate proper joint support, remember exact verbalization requirements, perform smooth movements, and monitor resident comfort – all while an evaluator watches closely. Another common concern emerges: “The only thing that really tripped me up was range of motion.”
Pre-Test Confidence Building Strategies
Practice Verbalization Until Automatic: Rehearse your provider’s exact pain inquiry phrase until it becomes second nature. Students often mention: “I almost forgot to verbalize them, letting me know if they felt any discomfort.” Daily practice prevents memory lapses under pressure.
Joint Selection Verification: For Prometric testing, immediately confirm which side and joints the instructions specify. Create a mental checklist: “Left shoulder” or “Right elbow and wrist.” This prevents the instant failure that students fear: wrong joint selection.
Movement Rhythm Development: Practice the three-repetition pattern with consistent timing. Smooth, controlled movements demonstrate competence and help maintain calm focus during evaluation.
During-Test Anxiety Management
Breathing Technique Integration: Use controlled breathing during transitions between movements. This maintains oxygen flow and prevents shallow breathing, which increases anxiety during precise motor tasks.
Evaluator Interaction Strategy: Remember that evaluators want students to succeed. If you forget verbalization timing, recover naturally: “How are you feeling? Any discomfort with these movements?” Most evaluators appreciate recovery efforts that show safety awareness.
Focus Redirection Methods: When anxiety peaks, redirect attention to the resident’s comfort rather than the evaluator’s presence. This natural focus helps maintain the caring interaction that evaluators expect while reducing performance pressure.
Joint Selection Protocols: Avoiding Critical Failures
Joint selection errors represent one of the most preventable failure causes, yet students consistently struggle with provider-specific requirements. Understanding each system’s selection rules eliminates this common source of testing anxiety.
NNAAP Joint Selection Decision Tree
Random Assignment System NNAAP’s computer randomly selects either “PROM for one shoulder” OR “PROM for one knee and ankle” as part of your five-skill test. You cannot predict which you’ll receive, so prepare thoroughly for both possibilities.
Side Selection Guidelines
- Choose either the right or left side unless the scenario provides a specific direction.
- Most students default to the right side for consistency
- If the scenario mentions weakness (“resident has left-side weakness”), exercise that side
- Position considerations: ensure comfortable access for smooth movement execution
Prometric Joint Selection Requirements
Three Possible Assignments: Prometric randomly assigns one of three options: shoulder alone, elbow and wrist combined, OR hip, knee, and ankle combined. Each represents a distinct skill with specific movement requirements.
Critical Side Specification Rule: Unlike other providers, Prometric explicitly states which side to exercise in the test instructions. The evaluator will say something like: “Provide passive range of motion exercises to the resident’s left shoulder.”
Verification Strategy
- Listen carefully to the complete instructions.
- Repeat back for confirmation if uncertain: “Left shoulder exercises, correct?”
- Mark the instruction card if provided to prevent confusion during setup
- Remember: wrong side selection typically causes immediate failure
Headmaster Joint Selection Protocols
Two Standard Options: Headmaster testing includes either shoulder exercises OR hip and knee exercises. The absence of separate ankle requirements in the hip/knee skill distinguishes Headmaster from other providers.
Flexible Side Selection: Either the right or the left side is typically acceptable unless the scenario provides specific guidance. Students can choose based on positioning, convenience, and comfort access.
Actor Interaction Consideration: The test resident (actor) might indicate preference: “My right side feels stiffer today.” Use these cues to guide selection while maintaining proper technique regardless of the side chosen.
Joint Movement Requirements by Provider
Shoulder Exercises (All Providers)
- Flexion/Extension: Arm up toward the ceiling, back down to bed
- Abduction/Adduction: Arm out to the side, back to the body side
- Three repetitions of each movement
- Support at the elbow and wrist throughout
Lower Extremity Variations
- NNAAP: Knee flexion/extension + ankle dorsiflexion/plantarflexion
- Prometric: Hip, knee, AND ankle movements combined
- Headmaster: Hip and knee movements (ankle not separately required)
Elbow and Wrist (Prometric Only)
Three repetitions of each movement
Elbow flexion/extension: Bend and straighten the arm
Wrist flexion/hyperextension: Hand down, then back/up
PROM CNA Skill Video Demonstrations
Watch experienced CNAs demonstrate proper PROM technique for each major joint group covered in skills testing. These video demonstrations show correct hand positioning, movement timing, and communication strategies aligning with all providers’ testing requirements. Use these visual guides alongside your written preparation to build confidence in your technique before facing the evaluator.
PROM FAQ for CNA Students
NNAAP tests the shoulder OR knee/ankle with candidate side choice and requires “discomfort” verbalization before and during movements. Prometric tests shoulder, elbow/wrist, OR hip/knee/ankle with explicit side specification and requires name greeting plus discomfort reporting.
According to official NNAAP documentation, you must use “discomfort” specifically. Prometric requires asking about “discomfort,” while Headmaster allows “pain or discomfort” phrasing. Check your provider’s exact requirements.
This depends on your testing provider. NNAAP typically allows candidate choice unless the scenario specifies otherwise. Prometric explicitly states which side is in the test instructions. The Headmaster usually allows either side to be selected.
Failure to ask about pain or discomfort is typically an automatic failure for PROM skills across all providers. This represents a critical safety element that cannot be missed.
This varies by state and testing provider. Prometric still requires masks in many locations, including Florida, as of 2025. NNAAP policies vary by state. Headmaster continues mask requirements in most testing locations. Check with your specific test site for current policies.
While hospital CNAs rarely lead PROM independently, they must understand proper technique for delegation scenarios. Long-term care and home health CNAs regularly perform PROM as part of restorative care programs.
All providers require three repetitions of each movement unless the resident reports pain. Movement should be smooth and controlled throughout the range.
No, joint selection errors typically result in automatic failure. Verify which joints your instructions specify before beginning the skill demonstration.
Ready to Ace Your CNA Exam?
Get everything you need: video guides, practice tests, and detailed study plans